Introduction
As the main objective of any studio is to produce high-quality assets for products that can be marketed and sold both online and offline, it's essential to first identify which products need to be captured. You also need to ensure you have samples that accurately represent these products, as well as determine how many assets are required for each one. Additionally, it's important to know what type of assets you'll need, such as images, videos, 360-degree shots, or 3D visuals.
In ProStudio we combine three different parts to make production successful:
- Work Order
- Products (in the Work Order)
- Assets (in the Work Order)
Work Order Main Page
The overview page presents a detailed view of all active Work Orders, including the number of products and their production progress. Based on the Work Order configuration, you can also access additional information such as key dates, assigned personnel, and the designated studio.

To track progress, the Work Order can be updated by changing its status. Each status reflects a different stage in the production process, such as 'Pre-Shoot Preparation,' 'Capture Mode,' or 'Post-Production.'
Work Order details
In ProStudio, all production activities are organised around the Work Order. It brings together Products and Assets to streamline the workflow for you and your team.
- Settings (Instructions)
- Products in the Work Order
- Assets in the Work Order
- Uploading Assets
- Tasks
Settings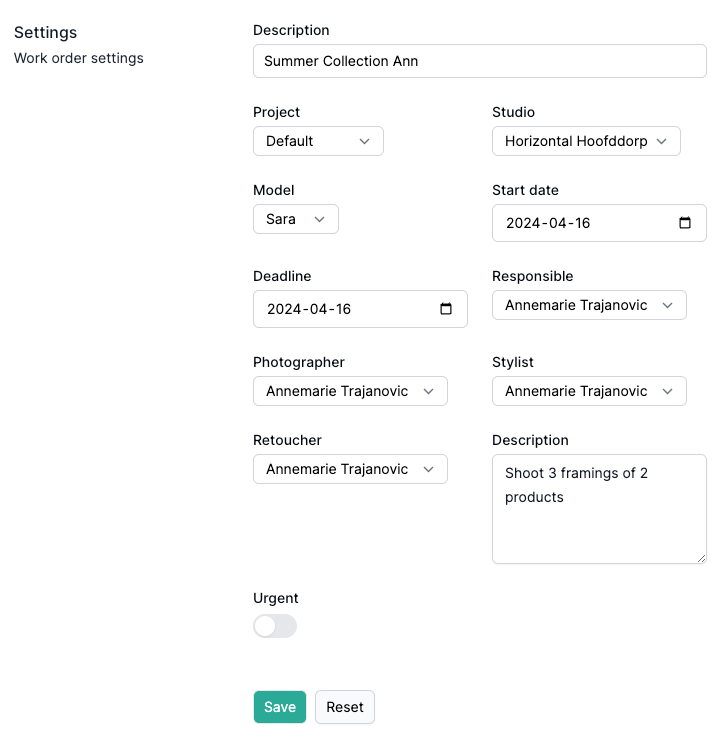
The Settings view provides all the essential information needed for a photo shoot, including:
- Which studio (bay) will be used
- Who will perform the shoot
- The deadline
- Specific instructions for the team
The attributes in the Settings menu can be customised to suit your specific needs. You can also add new attributes or remove those that are not relevant to your team. For instructions on editing, adding, or deleting attributes, please refer to System Configuration, Work Order Attributes.
Products
Each Work Order includes a list of Products, also known as the shoot list. These are the Products scheduled for your photo shoot, representing the items planned for that specific session.

Note: A single product can appear in multiple Work Orders simultaneously. This allows the same product to be scheduled for different shoots, sometimes even in parallel, offering greater flexibility in planning.Product data can be filtered and sorted to streamline workflow. The available filters depend on how the Product attributes are configured. For more details, refer to the System Configuration section on Product Attributes.
Actions can be applied to all Products in the Work Order, either in bulk or individually.
Product status provides visibility into the progress of specific Products within your Work Order. A Product may have different statuses if it appears in multiple Work Orders, allowing you to track the progress of Product visualisation more effectively.
Assets
The Assets view displays all Assets associated with the Products listed in this Work Order. By combining Product information with Style Guide data, we can create a placeholder with a valid name before uploading the Asset.

Knowing which Assets will be created from the photo shoot helps validate the expected content. If you've mapped Style Guide Views to the Products in a Work Order, these will be displayed in the 'Mapped Views' column on the Product listing.
Note: You do not need Products in the Work Order to upload Assets. You ca upload any visual content directly to the Work Order, and those Assets will be stored under the Assets tab, not linked to a specific Product or View.ProStudio handles multiple versions of an Asset, with each version independent of the file type.
Upload Assets 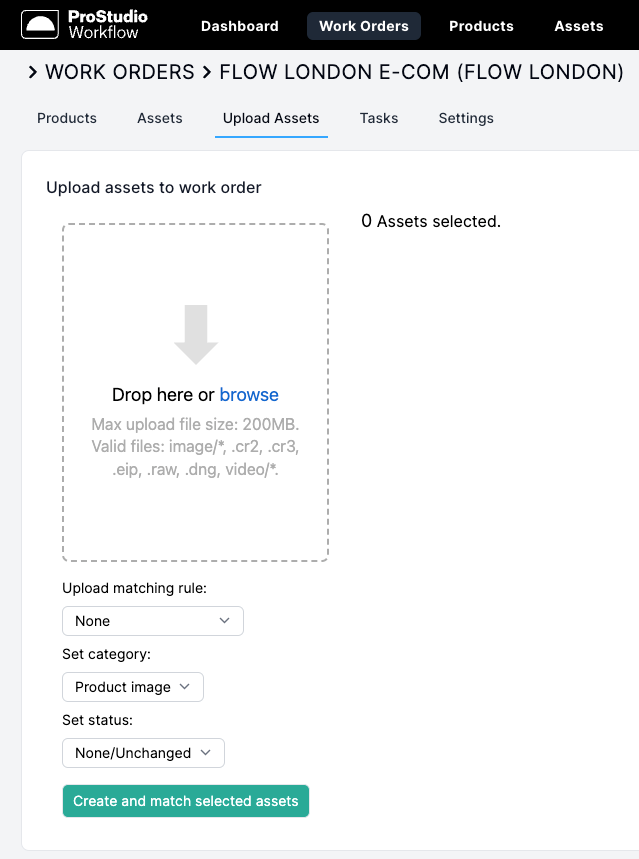
Here you can add Assets to the workflow. This process can be done in bulk or singular.
By using the upload recognition rule, you can automatically match Assets to Products and Views.
You can also assign a status when uploading Assets, indicating their current stage in the process.
Note: Assets can only be added to ProStudio through a Work Order. Deleting a Work Order that contains Assets will also delete all associated Assets.Tasks
Tasks are used to select a set of Assets and pass them on, such as sending them for retouching via APIs like Pixelz or Bright River.

The task will contain details about which images will be processed, their status, and relevant date stamps.
Was this article helpful?
That’s Great!
Thank you for your feedback
Sorry! We couldn't be helpful
Thank you for your feedback
Feedback sent
We appreciate your effort and will try to fix the article